Fly-fishing with indicators: When and how to use them
All about indicators, floats, suspenders—whatever you call the thing every other angler calls a bobber.

From different types of suspenders, to suspender rigs for nymphing, to how to fish 'em: Here's all you need to know to get started fly-fishing with indicators.
What you'll learn
- It's OK to fly-fish with an indicator.
- When to use an indicator
- Types of indicators
- How to set up an indicator rig
- Casting an indicator rig
- Reading your indicator and detecting strikes
- Growing out of indicators
- Wrapping up
- Frequently Asked Questions (FAQs)
It's OK to fly-fish with an indicator.
If you fished at all as a kid, it was probably with a bobber. Odds are, somebody gave you a blue or pink Snoopy or Barbie spinning rod. The red and white bobber jiggled when you had a fish on. Young you would then freak out and hand the rod to an someone more competent. Maybe that was just me.
Some fly anglers see indicators as an advanced version of those Snoopy training wheels. Fishing with an indicator prompts barely-concealed disdain. Heed not their sneers, fair seeker!
Whoever put that rod in your hands was doing the best they could. They were introducing you to something fun. And we're going for the same thing now.
Here's one tenet of this entire enterprise: Our leisure time is valuable. We can spend it how we want. And we don't need to address the world in Expert Mode, whether we're 7 or 70.
We make it easy where we can as we get started. This mindset we take helps us climb fly-fishing's steep learning curve at a sustainable pace. There's always time to make things more difficult when we feel ready. Using a bobber, or indicator, or suspender, or float—whatever you call it—has its place many different types of fishing, including fly-fishing.
Indicators help detect fish strikes when fishing subsurface flies (nymphs). An indicator can make the difference between a successful day catching fish and a frustrating day catching nothing.
When to use an indicator
Indicators are used when you're fishing flies below the surface of a river or lake, nymphs, or similar.
Indicators give us a visual sense of what's going on underwater. They help us estimate where our nymph is, how it's moving through the water, and when it's off its path. That could be either by a fish eating it (good!) or some kind of obstacle (not as good).
What does an indicator do?
Their full name, "strike indicators," explains one element of what indicators do. When a fish gives a tug on a nymph, the indicator moves. It helps us perceive a strike.
Another name for an indicator—a "suspender"—gives us an even better idea of what they do. They suspend our fly or flies in the water. This is central to using these fishing tools effectively. It tracks back to one of the most critical concepts we work with, and are frequently seeking: Drag-free drift.
A strike indicator, or suspender, creates a pivot point at the surface of the water. This hangs the weighted fly, which floats along seemingly untethered, as an actual aquatic insect or edible item (like an egg, or a leech) would travel downstream.
So long as that indicator is floating at the same speed of the current, and not producing a wake around itself, it's drifting drag-free, and the fly is fishing.
What happens when we fish an indicator rig?
This can be a little challenging to visualize, so let's walk through how it works, step by step, from the cast:
- We cast our indicator rig upstream and across. Aiming for it to land above a slot or run where we anticipate fish are in a feeding or holding lie. We use a cast that has a more open loop than a standard overhead cast. That helps everything land together, rather than strung out on straight a line. This helps the weighted fly get deeper, to the bottom of its tether, where it's fishing, faster. More on casting in a bit.
- Our rig hits the river's surface, and the weighted fly starts to sink. The indicator stays on the surface. Everything starts to speed up to the pace of the current. We follow the indicator with our rod tip.
- Sub-surface currents are slightly faster than those at the surface of the water. (This is a whole other discussion on laminar flow.) But basically blame the friction between the air and the river's surface. The sub-surface nymph starts moving slightly faster downstream than the indicator. You can also blame the indicator's air resistance. But, the nymph begins stretching out in front of the indicator, not at a perfect 90-degree angle to the surface suspender.
- At this point, we're drifting freely. There should be no wake or disturbed water around the indicator up top, a visual cue that shows it's moving at the same speed of the water. This is good. It's going great. Keep up the good work.
- Through sub-surface turbulence, soft pockets created by rocks or logs, our nymph floats merrily along. Above the surface, we monitor our indicator and look for anything resembling a strike. That might be where the indicator "bobs," and dips below the river's surface, or slows down momentarily.
- Eventually, we run out of fly line, and the entire rig comes tight to our rod. The indicator starts displacing water. It will often dance around, as the entire setup is pulled downstream by the current. Time to re-cast, using the surface-tension load the river has placed on our setup.
What happens in Step 5, if that indicator moves? Then, it's go time. Set the hook.
You still have to set the hook.
Just because the indicator moves, it doesn't mean the fish is hooked. You still have to set the hook.
Depending on how hard the fish eats (is it a sip, a nibble, or a chomp?) it may or may not hook itself.
A fish's mouth is a sensing organ. A fish uses its mouth to experience the world, by putting lots of things in, and keeping the things that taste like food. No matter how tastefully tied or successfully imitative your fly is, it probably won't taste like food, so the fish will spit it out.
Your hook may or may not (likely not) stick the fish during this process. So we set the hook on any disturbance to the indicator's drift. Yet another reason to use sharp hooks, and check your fly occasionally and touch it up with your hook sharpener. After it's been banging around on rocks down at the bottom of the river, the point can become dull.
There's going to be a delay between when a fish tugs at your fly and when the indicator moves. It's usually a half-second or so. To make up for this delay, you want to set the hook as soon as you see an indicator move, before the fish has a chance to spit the fly out.
Setting the hook on a non-strike is way preferable to not setting the hook on a strike. It's worth having to occasionally break off flies stuck into logs or hung up on rocks.

Types of indicators
There are a few of different types of indicators, each with its own advantages:
- Foam indicators
- Hollow indicators
- Yarn indicators
- Pinch-on indicators
- Dry flies as indicators
Foam indicators
Foam indicators are my go-to when I fish suspension rigs. They're durable. They're easy to move around on your leader as depths / conditions change. They come in both small and large sizes.
I tend to size indicators based on two factors:
- Fly size (using a larger indicator for larger flies)
- Water turbulence (using a larger indicator for more intense water)
The first factor is key. If your indicator is too small, it won't suspend the fly effectively. It will not float, it will sink.
My current favorite style is the Air-lock Classic indicator with the nut. Oros also seem to be good, but I haven't tried them. I believe Oros was the first to use the design where the leader passed through the core of the indicator. This eliminates the need to buy replacement Air-lock nuts, unless you lose the whole half-indicator...but I digress.
Color doesn't really matter to me. It's a lot easier to see a huge indicator compared to a size 20 dry fly. But choose a color that's visible to you.
Hollow indicators
Hollow indicators have a similar spherical form-factor to foam indicators, they're just hollow. For a long time, before foam, they were the prevalent type, marketed under brand names like Thingmabobber.
Since they're hollow, the overall weight is slightly less than a foam indicator, and they're a little more sensitive. They're slightly harder to rig, though. Often the doohickey that you jam into the eyelet to prevent the indicator from sliding all over your line falls off. That means you have to tie them onto your leader a different way, and they slide around more.
Yarn indicators
Yarn, or wool indicators are a bit more advanced than foam or hollow indicators.
They start as part of a system, and you make them up yourself each time, basically affixing the wool to your leader. There's a piece of surgical tubing that you snip off, then with a semi-complicated series of steps you button-hook a clump of yarn through the tube, over your leader, squeezing it into place.
There are a few different and brands, but one main manufacturer stands out, New Zealand Strike Indicator.
You can choose a larger clump of wool for bigger flies or burlier water, or a smaller clump of wool for tiny flies on a more placid stretch. The downside of a yarn system is it's slightly more difficult to set up than a simple twist-on foam indicator. It takes a little getting used to.
Here's NZ Strike Indicator's explainer gif:
Yarn indicators land more quietly, and are able to detect subtler takes. The latter point is key. When nymphing, it's typical to underestimate how many times fish engage with our flies. A big foam ball might not register those takes, and subsequently cause you to miss fish.
When I fished in Italy this summer, where almost every river was low and clear, my buddy Mike fished with a yarn system exclusively, and was very successful.
If I were to switch indicator styles today, I'd probably move to yarn. But, I don't indicator-nymph all that much. Next time I'm on the low and clear waters of Northern Italy or Slovenia where nymphing is de rigeur, yes.
Pinch-on indicators
Sometimes you just need a tiny little indicator, and only temporarily, for this one session.
Say you're dead-drift nymphing, with a lightly weighted bead head Pheasant Tail nymph, and you keep getting stuck on the bottom. You just need a little bit of lift to balance out the weight of the fly. A pinch-on indicator might be just the ticket.
A pinch-on indicator is basically a piece of foam with a pronounced median, and an adhesive back. You peel the sticker, fold it over your leader so it sticks to itself, and you're in business. At the end of the session, or after some time, it'll come off. I don't use these very much, because they feel too temporary and disposable.
Dry flies as indicators
The last but maybe most important indicator approach is using a dry fly as an indicator.
This is as simple as using a large-enough dry fly and tying on your nymph with a clinch knot off the bend of the dry fly hook.
This is easier with a larger fly, so is popular with foam grasshopper patterns (a hopper-dropper rig) or big stonefly dry pattern. The Chubby Chernobyl is a classic nymph-floating vehicle that can be tied in a variety of styles and sizes to imitate a variety of bugs. For instance, on the Deschutes during salmonfly season, a Pat's Rubberlegs below a foam salmonfly imitation is a go-to rig.
This formula works with smaller flies, it's just a matter of balance. Elk Hair Caddis patterns, for example, make a good top fly for a Serendipity nymph. That's a go-to Montana rig for me, when there are caddis around.
The cool part about using a dry fly as an indicator is that you'll occasionally induce fish come take a look at the nymph, then they'll strike the dry fly, or vice versa.
The less cool part about using a dry fly as an indicator is the increased complexity theory.
As the first law of fly rigging states: For every additional fly or branching stretch of tippet you add, you'll get more exponentially more tangles.
How to set up an indicator rig
Beyond the physical attachment point that's specific to the indicator type, be it a screw-on, or pinch-on, or dry fly, the single most important factor with indicator rigs is depth.
Odds are, if you're nymphing, and not seeing fish feeding on the surface, they're feeding near the bottom of the river. So you're going to want to attach the indicator to your leader in a position where it can suspend the fly just above the bottom of the water, around the tops of the rocks on the riverbed.
That's going to vary with every place you fish, but a good starting place is about 1.5x to 2x the estimated depth of the river in the riffle, run, pool, or slot where you think fish are holding.
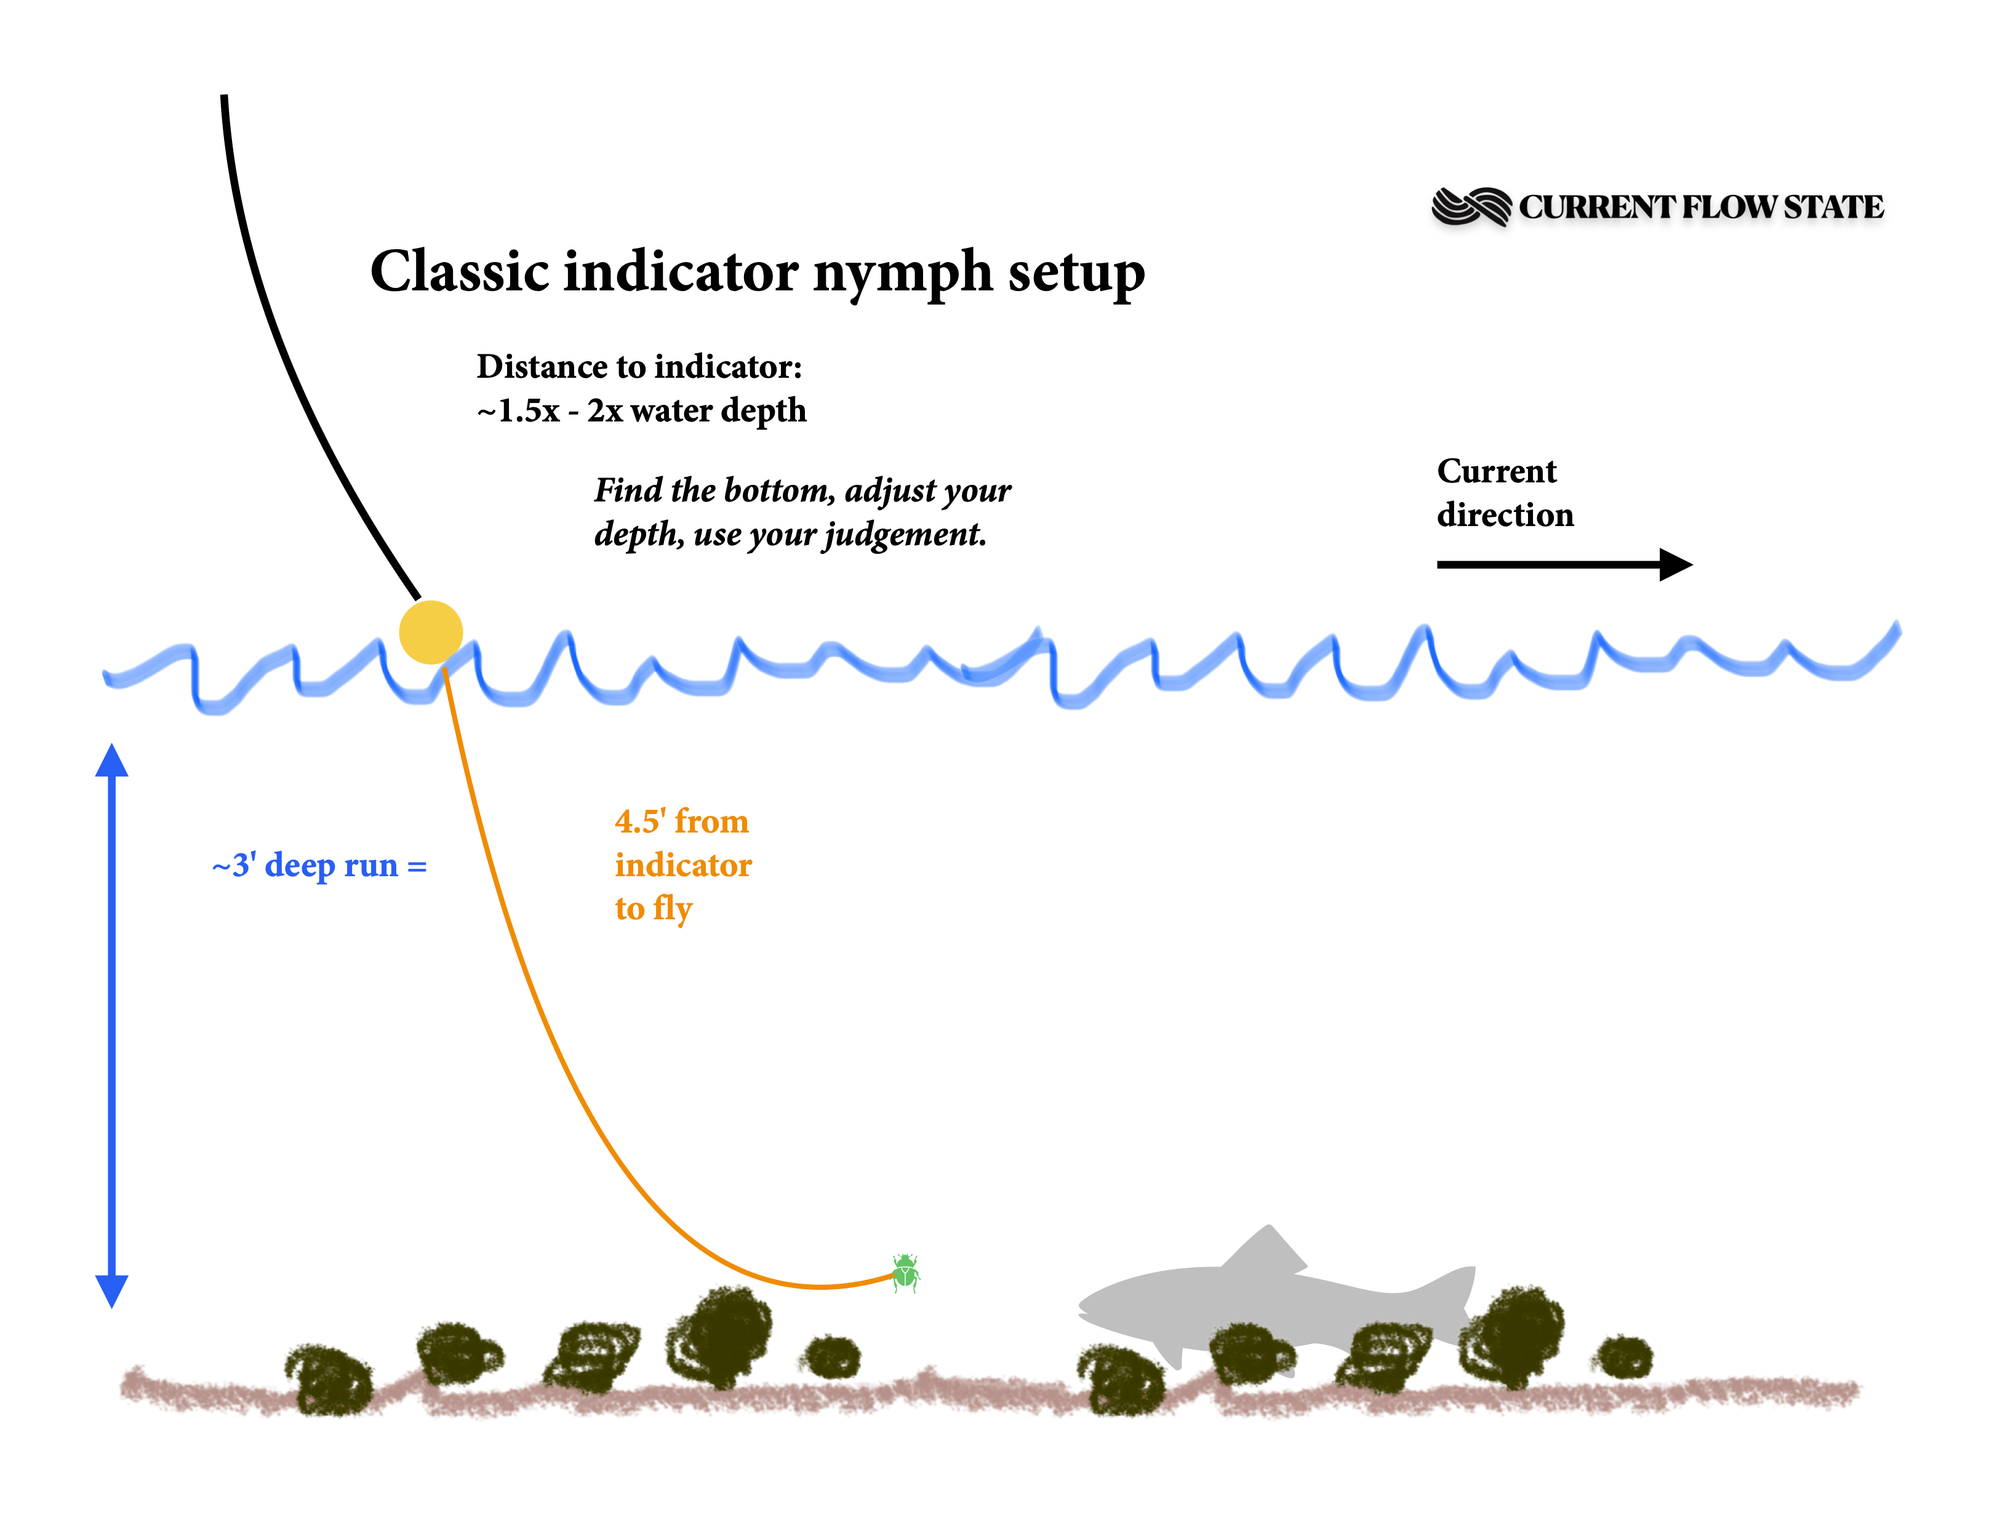
After you tie on your nymph and indicator, and start fishing, you're going to need to adjust. Go deeper before you go shallower. Go deeper until you can either feel (through vibrations in the rod and line) or see (with the indicator moving weird) the nymph bouncing off rocks, or dragging on the bottom of the river. Then back it off a bit, so you can get a clean drift through the zone you're nymphing.
With all indicator types, you're going to need to experiment a bit to dial things in properly and be successful.
It's rare an indicator rig just "works" straight out the box without adjustment, primarily trying to dial-in the right depth.
Multiple-fly rigs
As mentioned earlier, adding flies adds exponential complexity.
But, there's no reason, as you get more confident in your casting (or, your cutting-tippet-and-re-tying) you shouldn't think about fishing a multiple-fly rig below your indicator.
The first thing you want to be aware of is local regulations where you're fishing. Some jurisdictions don't allow multiple flies. Some limit you to two.
If it's a legit method in your area, the next thing you need to consider is the weight of your nymphs. Typically, you want the heavier fly as the "point" fly, that is, the fly that's at the end of the rig. This will pull the entire rig down lower into the water column, and allow the lighter nymph (sometimes called a "trailer") to flutter a bit and potentially tempt a fish.
There are endless variations in how your rig subsurface flies. So, don't take my word for it. Plenty of books and resources can offer you more complex formulas. Dynamic Nymphing by George Daniel was a huge influence for me.
Adding weight
The other factor, as you get more advanced, is additional weight. Sometimes the current is too pushy, or the slot is too deep, and you can't get the flies down in time.
It's typical that you add weight, either crimp-on lead-free split shot, or moldable tungsten putty, to help get your flies down. Loon makes good stuff here.
Typically weight is added above the end of the rig, some 12-18", so it forms a pivot point to the bottom of the river, and the fly or flies can move above it.
You can also tie in a tag of tippet at a similar position. If you use a tag of tippet, tie it on a slightly stouter piece of tippet than the leader, to account for the leader taper. Adding a tag to a leader to crimp split-shot to is a fairly straightforward procedure once you get used to it.
Place the leader and the extra tippet (for the weight; about 10") together and put in a double surgeon's loop. Of the ends going downstream, cut the extra tippet portion you just added. Don't cut your leader.
Of the ends going upstream, one is attached to your fly line. Don't cut that. Cut the other to about 3-4", then tie in a few double overhand knots, and crimp your split shot between the knots and the main leader. One advantage of this rig is when the split-shot gets hung up on the bottom (because you're adjusting weight to get things so you fishing close to the bottom, right? Right???) you can just break off the weight, and it should leave your fly intact.
You can also use a heavier fly, with a brass or tungsten bead-head, or weighted wraps under the body. Top competitive nymph anglers know precisely the grain weight of their flies, and often arrange them by weight, with multiple weights for the same patter, to be able to dial-in specific depths.
One important thing to remember is weight placement is often part of regulations. For instance, a "Utah rig" or "bounce rig," where weight forms the point, and a multi-fly array trails behind that, is illegal to fish in California, because it's often used to snag fish. So, check your local regs about weight placement and try to stay on the right side of the law.
A hook hone is a good tool to have handy when you're running nymphs through deep, rocky areas. Every so often (maybe once an hour, depending on how often you get hung up) check your fly, and make sure the point is still sharp.
If you can drag it (with some pressure) across your thumbnail and it doesn't dig in, sharpen it up with your hook hone.
Casting an indicator rig
There are plusses and minuses to casting an indicator rig.
For a beginner, it can be easier to cast an indicator rig without even really using an overhead cast; you just wait for the drift to run out, and surface tension to grab the indicator and load the rod, then flip it back upstream. Seriously, it's that simple, it's called a water haul cast.
As usual with casting stuff, it's easier to watch rather than read, so watch Pete Kutzer from Orvis offer some nymph rig casting tips better than I can:
But, if you need to send the fly further than 2-3x the rod length, and need to make a proper cast, you'll need to cast with a wider loop than usual. You don't want to bang your heavy nymph into You do want to land your rig in something more closely resembling a pile than a laid-out long dry-fly cast. Ironically, we have to re-introduce a bad habit we tried to eliminate in the very fundamentals of casting, and move our rod tip on an uneven path on the forward cast to make this happen. Here's Kutzer again (with some Tom for good measure):
Advanced anglers may want to learn the Tuck Cast, to create even more aggressive piles:
A big indicator fundamentally makes casting harder. Windier conditions make things even worse. You'll need to tweak your casting style to cast more open loops, and use your roll cast tactically.
Reading your indicator and detecting strikes
Detecting strikes with an indicator requires attention and practice. It's a method recommended for beginners because it's much easier to keep your eye on an indicator than a dry fly.
But that doesn't make it foolproof. The jokes about fly-fishing guides saying only "HIT!" and "cast again" all day are true, whether their custies are chucking a Chubby Chernobyl or a cat turd (the less-nice name for a Pat's Rubberlegs) under a bobber.
So, three things you can do to stay frosty while you're watching your indicator:
- Watch for any unnatural movement of the indicator. Your first cast will probably be your best cast, as you won't have had the chance to do anything to spook the fish yet. But, as you work a spot, watch for any movement that looks different than previous drifts.
- Be ready to set the hook. If the indicator suddenly dips or moves sideways, even a tiny bit, set the hook by rapidly lifting the rod tip. By the time an indicator dips, the fish has already had it in its mouth for a while. We've said this before. And we'll say it again (directly below) because it's so important.
- Learn to differentiate between a strike the bottom. A strike will be more like a short peck, or a tug, whereas a rock, or a hangup, will be a longer pull. You'll learn to feel the difference.
When fishing a dry fly, beginning anglers usually set too fast, because they're visually stimulated by the rise. They pull the fly out of the fish's mouth.
When fishing a nymph under an indicator, they set too slow, because by the time a fish has pulled a fly and moved the indicator, a few seconds have elapsed, and the fish may have spit the fly already.
So, when you're fishing under an indicator, be ready to set the hook on even the slightest variation, and set it quickly.
Pros and cons of using indicators
Pros:
- Indicators make it easier to detect subtle strikes
- Indicators help maintain your fly at a steady depth
- Indicator rigs can be easier to cast, with surface tension and weighted flies
- Indicators can improve catch rates
Cons:
- Indicators splash on pickup and landing and spook fish
- Indicators can be harder to cast in windy conditions
- Indicators are considered less traditional
- Indicators can be a barrier to growth
Growing out of indicators
As you get better, you may want to try nymphing without an indicator. The progression is fairly straightforward.
First, start using smaller, more subtle indicators. Switch to sparse wool, or stick-ons. Then, ditch the indicator and use tight line nymphing with a sighter tippet.
Last, get used to reading water and anticipating where fish are likely to hold, and strike. At that point you'll be able to dead-drift nymphs and strike when you feel the flow of energy from the universe.
Even experienced anglers use indicators in certain situations. Heavy water, deep pools, weird currents. There's no shame in using tools that help you catch fish. But, always try and grow your skills beyond the indicator. Consider it first and foremost a training tool, that will ultimately be replaced by casting prowess, feel for your flies in the drift, and a better understanding of the wayer.
Wrapping up
Indicators are valuable tools in a fly angler's arsenal, especially for beginners. They can significantly improve your ability to detect strikes when fishing nymphs and subsurface flies.
As with all aspects of fly-fishing, practice, experimentation, and experience will help you use indicators more effectively.
Frequently Asked Questions (FAQs)
Will using an indicator spook fish?
Yes. In most situations, a properly-sized indicator will probably spook some fish. Especially big ones. And, in very clear, calm water, even more so. You want to try and graduate to more subtle indicators, or fish without them.
It's not the visual of the indicator I'm most concerned with. (Although that indeed is something that bothers fish.) When it comes to spooking fish, it's the splash of the indicator hitting the water. Even when there's a delay between the splash-down of the indicator after a cast, and the sinking of the flies, and the way that resolves into a drag-free drift (say 5-10 feet down the water) I'm eager to cast an indicator in a way that doesn't make a lot of noise. Same with lifting the indicator from the hang-down to cast again. Slowly and quietly.
How far should the indicator be from my fly?
Generally, set your indicator at 1.5 to 2 times the depth of the water you're fishing (1.5-2x). So, if you're fishing in a three-foot-deep stretch, you're going to want 4.5 to 6 feet of leader between your point fly and your indicator. What's most important is you adjust as you get feedback (like, from hitting bottom, or not).
Can I use a regular dry fly as an indicator?
Yep! This technique is called a "hopper-dropper" and can be very effective. Use a buoyant dry fly (like a foam-bodied fly, or something with spun deer hair) as your indicator and tie a nymph off the bend of its hook with a clinch knot, on slightly finer tippet than you've used to attach the main fly.
How do I know when to set the hook when using an indicator?
Set the hook any time your indicator moves in an unnatural way: dipping, darting sideways, or stopping suddenly in moving water...HIT! HIT! HIT!